
With the just-released Windows attestation, we have some extra to tell about MDM Hardening. In this blog post, we will discuss the feature, what it is, what it does, and how it will work. Additionally, we will delve into how the first part of the blog post on Windows MDM Hardening is coming together with the new Windows Attestation. We’ll explore the integration of these two components and how they work to enhance the security and management capabilities of Windows devices.
What is Microsoft bringing to the MDM Hardening table?
Microsoft has introduced a new security feature for Windows devices, which aims to enhance the enrollment process. As part of Intune’s mobile device management (MDM) certificate, this feature requires a hardware verification step to secure the device’s registration. The critical components for this process include the device’s unique enrollment keys and a Microsoft Entra ID access token. These essential keys are securely housed within the device’s Trusted Platform Module (TPM) 2.0 chip and verified through attestation.
Introducing an attestation process for Windows device enrollment provides a clearer understanding of devices at a higher risk of security breaches. Microsoft will name it Windows Attestation. This process helps identify vulnerabilities and safeguards against potential threats, such as the unauthorized acquisition and misuse of an Intune MDM certificate or an access token. If such threats go unchecked, they could result in the impersonation of a properly enrolled device and unauthorized access to sensitive resources.
How attestation works

When a user enrolls a Windows device with TPM2.0, the Windows Attestation ensures that the enrollment credentials are securely stored on the hardware device. Once the device has a successful attestation, Intune provides attestation status reports to the admin. This allows the admin to ensure the user is enrolled on a secure and healthy device. The admin can then allow the user to MDM enroll the device as long as it remains in a good attestation state.
If we go a little bit deeper into how it works, it will look like the picture below

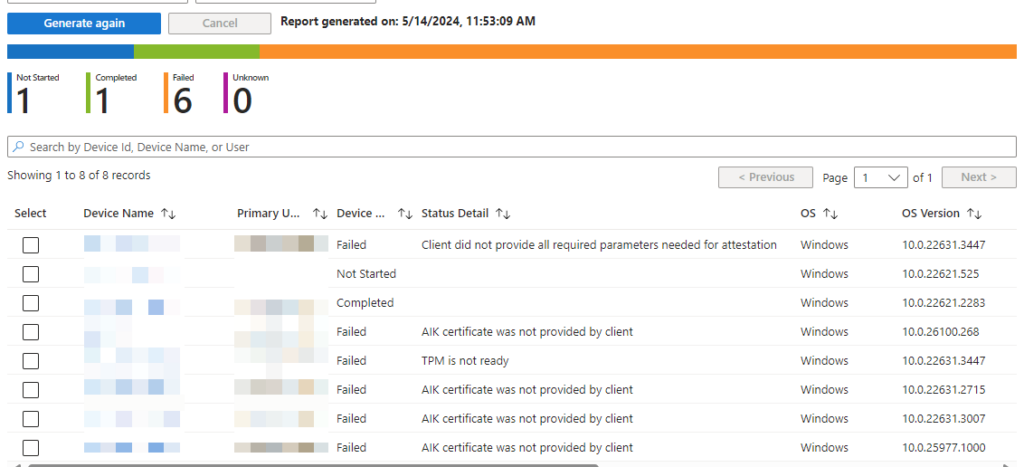
Report
Intune will provide an attestation report called the Device Attestation Status. This report will be key for Intune admins as it will allow them to easily view and monitor the status of the device attestation process. The report includes crucial details such as the primary User Principal Name (UPN), Device name, OS Version, and comprehensive status information, providing administrators with a clear device attestation status within their organization. This insightful report enables admins to efficiently track and manage device attestation, ensuring a more streamlined and effective management of devices within the Intune environment.
Status Details Windows attestation

Source: Microsoft
Attest Windows attestation
If a device fails its attestation, we can retry to attest it; therefore, we can go to Reports > Device Attestation Status to check the device status and initiate the retry process if needed. This allows us to ensure that all devices in our system are properly attested and meet the required security standards.
Please select the device or devices you wish to attest by checking the corresponding boxes and then clicking the ‘Attest’ button.

How will this work
Selection and Attestation Initiation: The IT Administrator selects the target devices within the device attestation report portal’s user interface. Upon clicking the ‘Attest’ button, a device action is triggered through the Graph API.
Device Action and Recovery Command: The selected devices receive an ‘Initiate Recovery’ command. Each device then performs a TPM (Trusted Platform Module) Attestation process in coordination with Intune.
Attestation Results and Reporting: The results of the TPM Attestation are displayed within the device attestation report. Finally, the IT Administrator can review the outcomes of the TPM attestation to complete the verification process.

Filter for Windows Attestation
In the upcoming section, we will delve into the process of combining various components. In our previous blog, we discussed the creation of device platform restrictions specifically for Windows. These restrictions offer the flexibility to be filtered, as we did for Windows 10 and 11. However, with the introduction of Windows attestation, a new value becomes available; with this extra value, we can add to the syntax, providing enhanced capabilities for device management and security implementation.
The new value is called the device.IsTpmAttested. With this value, we can create a syntax for our filters (device.IsTpmAttested -eq “False”)
If we look at the preview, we can see all the devices that were not attested with the TPM

How to use the filter
With the recently implemented filter, we can ensure that a Windows device cannot enroll in our system without undergoing an attestation process, thereby creating a more secure state for all our devices. But we have to take notice of which device we will block if we create a device platform restriction. Looking at the picture above, we can see we will block virtual machines and CloudPC because they are not attested. Therefore, we must make a filter to care for all our needs.
After creating the filter, we can go into the device enrollment restriction and add this filter; from now on, all devices without a Windows Attestation will not be allowed in our environment.

Conclusion
The introduction of Windows attestation marks an extra step in enhancing the security of our MDM hardening efforts. As seen in the first blog post and this new feature, the integration of Windows attestation represents a proactive and forward-thinking approach to safeguarding our systems and data.