For the last couple of weeks, I have been playing around with it to see how it works and what about the security of the administrator account created. If you are looking for a way to improve your security posture and simplify your password management for your Windows devices, you might be interested in learning about Windows LAPS.
Windows LAPS stands for Windows Local Administrator Password Solution, and it is a feature that automatically manages and backs up the password of a local administrator account on your Azure Active Directory-joined or Windows Server Active Directory-joined devices. In this blog post, we will explain what Windows LAPS is, how it works, what are its benefits and scenarios, and how you can set it up on your devices. You will have a better understanding of Windows LAPS and why you should use it for your password security and management.
What is Windows LAPS
Back in the day, we had Microsoft LAPS which was used for managing local administrator account passwords of domain-joined computers. Those passwords were stored in Active Directory so only specific roles could read its value. LAPS is short for Local Administrator Password Solution
Because we are now working with modern workplaces we needed a new solution to store and create those passwords somewhere in the cloud. This new LAPS is called Windows LAPS, which will automatically manage and backup the password of a local administrator account on your Azure Active Directory-joined devices and store it in AzureAD. In my opinion, LAPS can be helpful for (local) support who needs to help his/her users with their devices and keep them as secure as possible. So we are not going to hand out the local administrator account to our users.
Platform supported
All devices need to run at least the April 11 2023 Update. Supported editions are:
- Windows Server 2019
- Windows Server 2022
- Windows 10
- Windows 11 21H2/22H2
Keep in mind the legacy LAPS has to be disabled.
Configuring LAPS
To configure LAPS we need several steps to prepare, those are enabling it, configuring a local admin account, or enabling it (why to choose which).
Enable LAPS for the Tenant
The first step we need to do is enable LAPS in our tenant via Entra or AzureAD. We need to go to Device settings | Local Administrator settings and Enable to set it to Yes

Troubleshoot
For LAPS there is a separate event log where we can find some helpful resources if LAPS is working and properly configured. we can check if you’re device sees LAPS is enabled on a tenant level. In the event log go to Applications and Services Logs | Microsoft | Windows | LAPS
If you see an error with eventid 10059, LAPS is not enabled

Local administrator account
To let LAPS work we have to enable/create the local administrator account there are several ways to achieve this. We will have a look at two possibilities, OMAURI and Settings Catalog
OMA-URI
We can create a Local Admin account by creating a custom policy with a OMA-URI
Go to Devices | Configuration profiles and click on + Create Profile. select Platform Windows 10 and later. Profile Type Templates. Click on Custom and Create
Fill in Name, Description and click Next. Now we can create The OMA-URI by clicking on Add
OMA-URI: ./Device/Vendor/MSFT/Accounts/Users/Accountname/Password where Accountname would be the account you wish to use. And the datatype would be String with the Value of a strong Password.

OMA-URI: ./Device/Vendor/MSFT/Accounts/Users/Accountname/LocalUserGroup where Accountname would be the account you wish to use. And the datatype would be Integer with the Value 2

Click Next and assign the policy. After a device get the policy an account is created with that specific password.
Settings Catalog
We can also enable the built-in administrator by using the Settings catalog, with the Settings catalog it also possible to rename the user to you’re liking. Let’s create a Settings Catalog policy to achieve this.
For the settings, we are going to need the following:
- Accounts Enable Administrator Account Status – To enable the built-in local administrator
- Accounts Rename Administrator Account – Rename the built-in local administrator
Renaming the well-known Administrator account makes it slightly more difficult for unauthorized persons to guess this privileged user name and password combination.
Preferred
After talking with a Security Auditor and Ethical hacker about the local administrator accounts we prefer to use the Settings Catalog. Because we rename the user it is slightly more difficult to guess. For creating another local admin account via the OMA-URI it takes a hacker just some extra seconds to get that account as well so there is no gain. But there is something else that is more of a security risk.
We set an OMA-URI policy for every device with a password in it. After the account is set by Intune, LAPS needs to reset it. At that time all the devices have the same local admin password while the Settings catalog has no password set.
If the Hacker could break LAPS the device’s local admin password is never changed and can take the password hash and logon much easier. This is our main reason to prefer the Settings Catalog policy to set the local administrator
LAPS Policy
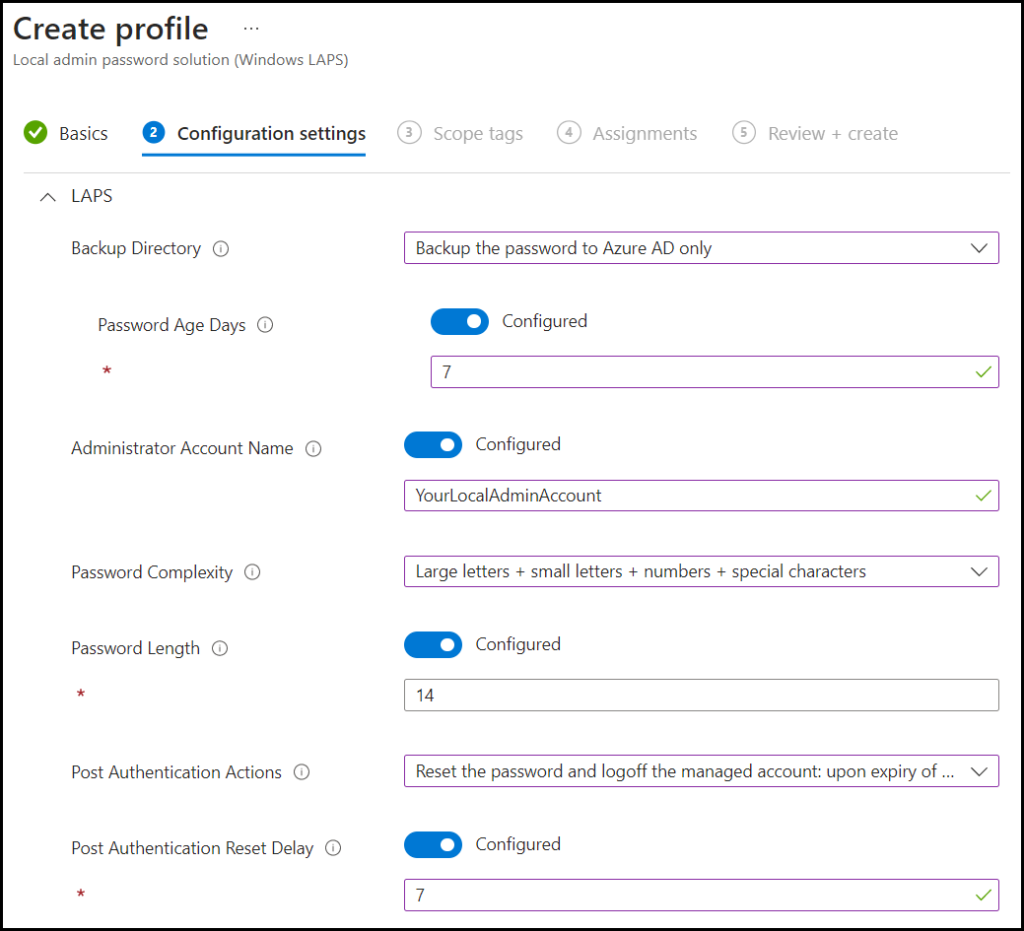
Because we have a local administrator account we are ready to set up LAPS. Therefore we need to go to the Intune portal Endpoint security | Account protection and click on + Create Policy, Select Platform Windows 10 and later, and Local admin password solution (Windows LAPS) click Create
Fill in a name and description and click Next
Intune support for Windows LAPS includes the following capabilities:
- Backup accounts and passwords – You can choose to have devices back up their account and password in either Azure Active Directory (Azure AD) in the cloud, or your on-premises Active Directory. We are using AzureAD in this configuration
- Password age– is the age of the Password set by LAPS, it can be set between 7 and 365 days we like to set it to 7 Days. Where default is 30
- Administrator Account name – If the local admin account name is changed or another account is used then this is the place to set it.
- Password Complexity – Here we can set the Password complexity to:
- Large letters
- Large letters + small letters
- Large letters + small letters + numbers
- Large letters + small letters + numbers + special characters (This one is recommended by Microsft)
- Password Lenght – Here we set the password length it can be between 8 and 64 characters we like to use 14
- Configure post authenticating actions – Define actions that a device takes when its local admin account password expires. Actions range from resetting the managed account to using a new secure password, logging off the account, or doing both and then powering down the device. You can also manage how long the device waits after the password expires before taking these actions. We set it to Reset and Logoff
- Post Authentication reset delay – Use this setting to specify the amount of time (in hours) to wait after an authentication before executing the specified post-authentication actions. We like to set it to 7 Hours

Click Next and assign to a Group. This can be a User or Device group.
If the policy would be set correctly it will be visual in the event log again with eventid 10022 with all the fields configured.

View LAPS Password
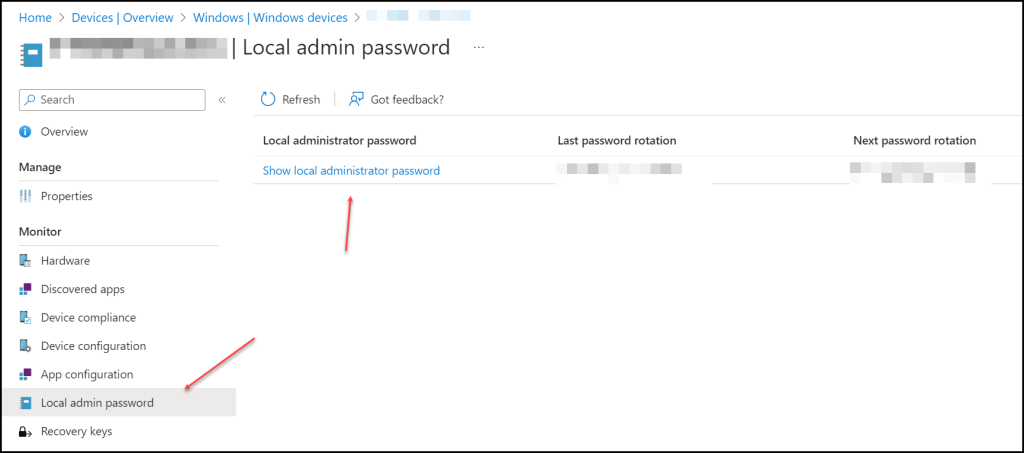
There are 2 ways to get the password of a local administrator, we can do it on the device itself under the Local admin password.

When clicked on Show local administrator password a new blade is shown with the information of the account name and password when we click Show the password is shown.

The other way to achieve this is to go to Entra and click on Devices | All Devices and Local administrator password recovery (Preview). Here all devices with a LAPS password will show up. In my case just one for now

Create a specific role for reading the password
If we go to Azure AD or Entra and create a new custom role with the following options

It can be helpful to set this for a specific group of users. Or can use the built-in roles Cloud Device Administrator, Intune Administrator, and Global Administrator
Create a Conditional Access policy
It is good to have a Conditional Access policy in place, Conditional Access policies can be scoped to the built-in roles like Cloud Device Administrator, Intune Administrator, and Global Administrator to protect access to recover local administrator passwords. A good place to start is Require MFA for administrators with Conditional Access – Microsoft Entra | Microsoft Learn and the blog by Kenneth van Surksum.
Conclusion
Windows LAPS is a powerful and convenient feature that helps you secure and manage the local administrator passwords of your Windows devices, whether they are joined to Azure AD or Windows Server AD. With Windows LAPS, you can automatically rotate and back up the passwords, retrieve them via the Azure portal, and apply Azure RBAC policies for authorization. Windows LAPS is natively integrated into Windows and does not require any external installation. It also supports legacy LAPS scenarios and interoperability. Windows LAPS is available now on the latest Windows editions with the April 11, 2023 security update. If you want to enhance your security posture and simplify your password management, you should give Windows LAPS a try!

[…] LAPS around Intune […]
[…] using a custom policy with OMA-URI settings. As MVP Joost Gelijsteen discusses in his blog post, LAPS around Intune (joostgelijsteen.com), this can be a bad idea since the accounts created with OMA-URI will have an identical identity and […]
[…] must be created in Intune. In the following blog post, I made the policies step by step “LAPS around Intune“. But when the policy is set what happens on the device and what happens when we change the […]
[…] have already configured the Windows LAPS policy. This is an example by Joost Gelijsteen.Proper […]